Descarga de material
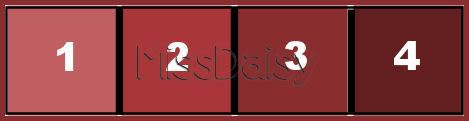
Primero haremos una paleta de colores para nuestra bolsa, como el ejemplo que sigue.
De un mismo color vamos eligiendo tonos más oscuros o claros:
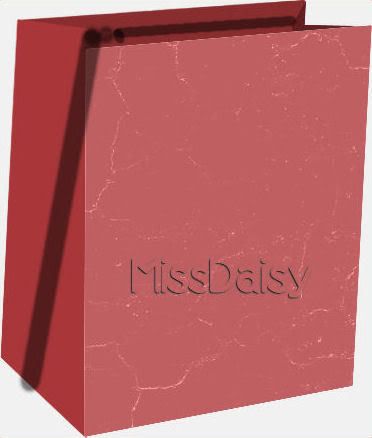
Abrir el archivo "bolsaluisa_alfa.pspimage".
Importante: Guardar como y ponerle otro nombre. Guardar el original.
Rellenar el fondo con blanco o cualquier otro color claro que nos sirva para visualizar mejor el trabajo. Al final se puede eliminar o no, como prefieras.
Nueva capa de trama.
Selecciones - Cargar selección de canal alfa. Elegir la selección 2.
Rellenar la selección con el color 3. Anular selección.
Nueva capa de trama.
Selecciones - Cargar selección de canal alfa. Elegir la selección 3.
Rellenar con el color 2. Anular selección.
Nueva capa de trama.
Selecciones - Cargar selección de canal alfa. Elegir la selección 4.
Rellenar con el color 3. Anular selección.
Selecciones - Cargar selección de canal alfa. Elegir la selección 5.
Rellenar con el color 4. Anular selección.
Nueva capa de trama.
Selecciones - Cargar selección de canal alfa. Elegir la selección 1.
Rellenar con el color 1. Anular selección.
Filtro Unlimited 2.0 - Photo Aging Kit - Cracked paper - Intensity 36.
Nueva capa de trama.
Pincel redondo. Negro. Tamaño 10. Dureza 50. Opacidad 50. Trazar una recta en el borde superior de la bolsa.
Cambiar el tamaño del pincel a 20 y trazar otra línea en la parte lateral.
Desenfoque Gaussiano 12. Bajar la opacidad de la capa a 45% y Modo de mezcla: Luminosidad (heredado)
Con herramienta Seleccionar área - Rectángulo o con Borrador eliminar partes de la sombra que se hayan salido de su límite
Activar la capa (Trama 6) donde se encuentra el frente de la bolsa.
Nueva capa de trama. Cargar selección de canal alfa. Elegir la selección 6. Rellenar con color sólido contrastante o con una trama acorde, evitando motivos rayados. Anular la selección.
Sombra negra: 2 - 2 - 20 - 2 y de nuevo con los dos primeros valores negativos.
Nueva capa de trama. Cargar selección de canal alfa. Elegir la selección 7. Rellenar con un color claro del estampado. Agregar ruido: Uniforme, Monocromo 20. Anular la selección. Sombra igual que antes, pero Desplazamiento: 1 - 1
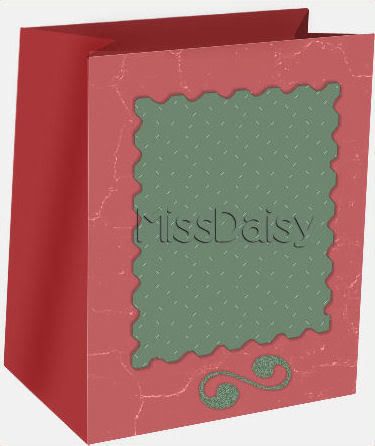
Esto es lo que debes tener realizado.
Ocultar la última capa. Fusionar capas visibles. Sombra: 3 - 3 - 50 - 10, negro.
Destapar la última capa.Tamaño del lienzo. Sólo cambiar el alto a 700 pixeles, la imagen debe ir abajo. Volver a rellenar la última capa de color claro.
Activar la capa superior.
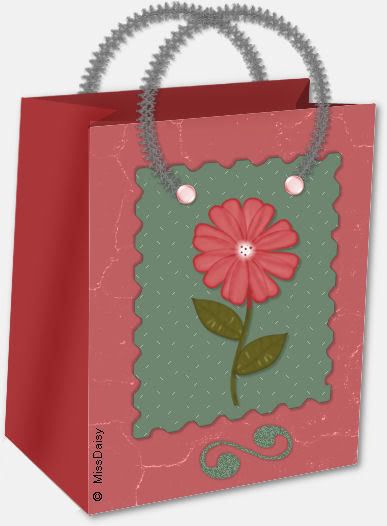
Abrir el resto de los materiales, manija, botoncitos, flores. Colorear y redimensionar lo que sea necesario y decorar.
Con respecto a la manija (asa) ubicar primero la frontal. Duplicar la capa, ubicar la otra detrás de la bolsa, y desplazar un poco hacia la izquierda (ver modelo).
Dar a todo una sombra ligera como la que se ha usado.
Puedes colocar nombre en nueva capa y copyright.
Cualquier texto debe ir con la misma inclinación de la bolsa o de la contrario, en sentido vertical.
Fusionar capas visibles. Recortar la imagen.
Exportar como jpg. O eliminar la capa del fondo y exportar como gif. Para regalarla es mejor guardar como png, sin fondo.
Este tutorial tiene muchas posibilidades de color y decoración. Verás que no todas las tramas o efectos de textura quedan bien porque las partes de la bolsa tienen una inclinación o perspectiva,
así que hay que tener cuidado en este detalle.
Espero que haya sido de tu agrado y fácil de realizar.
El material para descargar es realización de MissDaisy.
El presente tutorial es exclusivo para este blog. Prohibida su reproducción.
Enlázalo si es de tu interés.

LOUISE BAG
Translation by Cinn
Visit Cinn's web: Wright's Lair
First, we will make a color palette for our bag, similar to the example below.
In the same color scheme, choose 4 colors in lighter and darker shades.
Open file "bolsaluisa_alfa.pspimage". Duplicate and close the original.
Add a bottom layer and flood with white or another light color to see the image better.
Layer, new layer.
Selections: Load selection from alpha channel, choose selection 2.
Fill the selection with the #3 color from your palette. Select none.
Layer, new layer.
Selections: load selection from alpha channel, choose selection 3.
Fill the selection with the #2 color from your palette. Select none.
Layer, new layer.
Selections: load selection from alpha channel, choose selection 4.
Fill with the #3 color from your palette. Select none.
Layer, new layer.
Selections: load selection from alpha channel, choose selection 5.
Fill with the #4 color from your palette. Select none.
Layer, new layer.
Selections: load selection from alpha channel, choose selection 1.
Fill with the #1 color from your palette. Select none.
Effects: Plugins, Filter 2.0 Unlimited, Photo Aging Kit, Cracked paper- Intensity 36.
Layer, new layer.
Paint Brush, round tip, size 10, black, density 50, opacity 50.
Draw a line on the upper edge of the bag. Resize the brush tip to 20 and draw another line on the side.
Adjust, Blur, Gaussian Blur, 12%.
Lower the opacity of the layer to 45% and change blending layer option to bright light.
With the lasso tool or the rectangular selection tool, select and delete portions of the shadow on the front of the bag.
Stand on layer 6 (front of the bag) Layer, new layer.
Selection, Load selection from alpha channel, choose selection 6.
Fill selection with a solid color or contrasting pattern, avoiding the lined back ground.
Effects, 3d effects, drop shadow.h&v 2, 20%, color black. Repeat using -2 for h&v.
Layer, new layer, Selections, load selection from alpha channel. Choose selection 7. Fill with a light color. Adjust, add/remove noise, add noise. Uniform, monochrome 20%. Select none
Use the same drop shadow as before, changing both = & - to 1.
Hide the last layer. Merging layers visible. Drop shadow: 3 / 3 / 50 / 10, black.
Resize the canvas to 700 pixels high, and fill the last layer with a light color.
On the top layer. Open other materials, handle, button, flowers. Coloring and resize whatever it takes and decorate.
Regarding the bag handle, locate the first layer. Duplicate layer, move behind the bag, and move a bit to the left (see model)
Give everything a drop shadow the sema as before.
You can put a new layer name and copyright.
Any text you add should go with the same inclination of the bag or the opposite, vertically.
Merge layers visible. Resize or cut the image.
Export as .jpg Or remove the bottom layer and export as gif
Gift (bag) is better saved as .png without the background layer.
This tutorial has many possibilities using textures & patterns for fills.
However, some of the patterns, etc do not appear in correct perspective, so care must be taken in selections.
I hope this tut has been easy for you and you have liked it!


 -
- 


0 comentarios:
Publicar un comentario